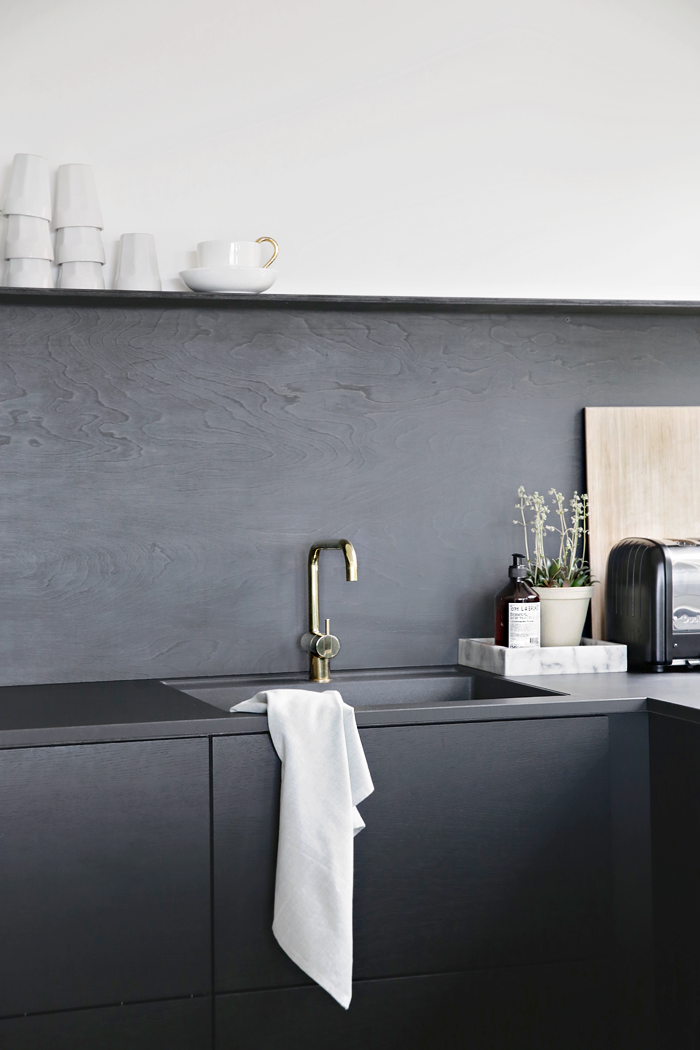
The finishing touches are coming together in the new kitchen, and one of my latest project is this backsplash in black plywood. I needed something dark behind the sink to make the brass kitchen faucet pop out, and I was thinking about black tiles until I came up with this idea instead. That way I could easily make a little shelf as well. I think plywood is a lovely material, and I love that the wooden pattern shows and creates structure even though I have stained it black.
WHAT I DID:
– I bought plywood in the exact size that I needed ( the shelf was cut in the store as well )
– I stained it with three coats of the Lady Pure Nature 9044 Kullsort
– Then I treated it with two coats of Osmo Top Oil to make it water-repellent.
– First I attached the large plywood board with screws.
– Then I glued the little shelf to the DIY backplash, before I also used screws from the top and down.
– At last I painted all the screws black to make them blend in..
An easy and afforable backsplash done in a few!

Images: Nina Holst

Det ble kjempefint Nina! Veldig god idé : )
Ha en fin ny uke –
klem Elisabeth
Så hyggelig at du liker det! Vi er veldig fornøyd med resultatet 🙂
God uke til deg!
klem
Just amazing! What a clever and beautiful solution!
Thank you so much! I´m glad you like it 🙂
xx
Det ble helt utrolig lekkert! Kan jeg spørre hva slags kjøkken du har? Er det ‘vanlig’ sort matt finish eller er det struktur i det? Skal selv ha svart kjøkken fra Drømmekjøkken, og ditt er til stor inspirasjon
Tusen takk for det, Linn! 🙂
Kjøkkenet vårt er i fra JKE Design, og er i sort eik så det er trestruktur i det ja…
Lykke til med nytt kjøkken. Håper du blir fornøyd !
Nina
This is such a great idea!! Really love the kitchen!! 🙂 xx
queenmillie.blogspot.com
Oi så fint!! No fekk eg også lyst på svart kjøkken 🙂 Og godt mogleg eg må låne den fine kryssfinerideen 🙂
Tror du at det går an å bruke sånn ved kokeplatta også eller anbefaler du noe annet?? Har du noen tips ?
Lekkert hos deg
This looks amazing! x
[…] By Nina Holst […]
So nice! And really clever idea 🙂
Fantastic! Love it!
I love plywood! Nice idea Nina 🙂
Wow, så fint! Nydelig!
Hvor dyp er hyllen på toppen? Er den kun festet med skruer i platen som er inntil veggen eller hvordan har du løst det?
Wow! Så snyggt! Och nu har jag hittat till din fantastiska blogg tack vare seventeendoors.
[…] 1. DIY Plywood BacksplashA really cool alternative to tile, using plywood to create a backsplash. Get the info over at Stylizimo. […]
[…] Read more about how we made the black wooden backsplash in my blogpost “DIY Backsplash” […]
This is simply amazing Nina!! I haven’t been able to choose a backsplash for over a year because I haven’t found anything I like that much, but this, this is so great!
You’re so talented. 🙂
[…] I found this DIY project on Stylizmo blog on how to make this super cool backsplash. This oozes with style, perfect when you’re on a tight budget and such a simple design solution. Image Source – Stylizmo Blog […]
[…] Above, a sleek and modern black backsplash made from painted plywood by Stylizmo that looks high end and more expensive than it actually […]
[…] credits: Melissa DiRenzo; Danielle and Austin; Dabney Frake; Chez Larsson; Traveling Mama; Stylizmo; Baloncici/Shutterstock; June […]
[…] Via Stylizimo Blog […]
Love it! How many mm thick is The plywood?
[…] Stylizimo […]
Looks great! Where’s the kitchen from?
Thank you! The kitchen is from JKE Design.
[…] ja hyvännäköinenkin idea keittiön välitilamateriaalista: vaneri. Tämä toteutus löytyi Stylizimo-blogista (kannattaa muuten tsekata). Mustaksi maalattu vaneri on käsitelty Osmo-öljyllä vettä […]
[…] One of the great things about plywood is the slightly raised grain. Use a long piece as your kitchen backsplash and paint it to blend. Not only is it a simple solution, you’ll be surprised how modern the feel is when you’re done. (via Stylizimo) […]
så kult!
hvilken byggevarehandel var du i der du fikk kuttet alt i den str. du ville? har så lyst til å lage en kul barneseng 😀
Takk for det 🙂 Jeg var på Maxbo. De kapper til for deg mot en liten betaling…
Lykke til med barneseng-prosjekt – det blir sikkert bra!
Nina
hei, takk for svar! ja håper det 🙂 ha en fin uke!
[…] hurt to reapply the top oil from time to time.” Go to Stylizimo for more on the DIY Backsplash and to see the Kitchen Before & […]
Looks great. How tall is the backsplash from the counter up? How deep is the shelf? Is this 1/4″ birch plywood?
[…] project #12: Last but not least, I’m a huge fan of the high-end designer look Nina from Stylizimo achieved with her kitchen when she painted a plywood panel […]
[…] méga fan de cette cuisine qui a l’air de couter super cher alors qu’en fait Nina de Stylizimo a juste peint des panneaux en contreplaqué en noir et le résultant est bluffant! Un article […]
So smart! I am wanting to do a backsplash, but have no idea! But how do you do it with protecting it from water? Have you some protection in the wet-sone?
Thank you! I treated it with two coats of Osmo Top Oil to make it water-repellent 🙂
This is beautiful Nina, loving the natural sleek look of your kitchen. You have given us ideas for our kitchen here in NZ. Can I ask what material/ colour is your kitchen bench? Looking for cost effective solutions without compromising on design elements. Looks almost more of a charcoal than full black, love it! 🙂
Gorgeous idea and I love that it’s using natural materials. How has it held up over time?
[…] love the modern, minimalist look of this DIY plywood backsplash from ‘Stylizimo’. Plywood is an inexpensive but popular material in modern design, and […]
Hello Nina,
I love the splash back so much that I’m going to recreate it. However in my kitchen the splash back will be behind the electrical cooker – is that something you would recommend?or do I need to apply a different fire free treatment? I’m thinking the shape of the wood might get affected by heat? Help please :), thank you!
I don´t think I would use this behind the electrical cooker since it´s wood. What about some black herringbone tiles?